Содержание
Managing Access Rights
InstantCMS 2 helps to automate the configuration of access rights for different user groups. In the component’s control panel, you can add a special action allowing to detect the permissions. These permissions can be then checked in the frontend and in templates.
Access Rules
Access rules are conditions that determine the ability of a registered user to perform an action.
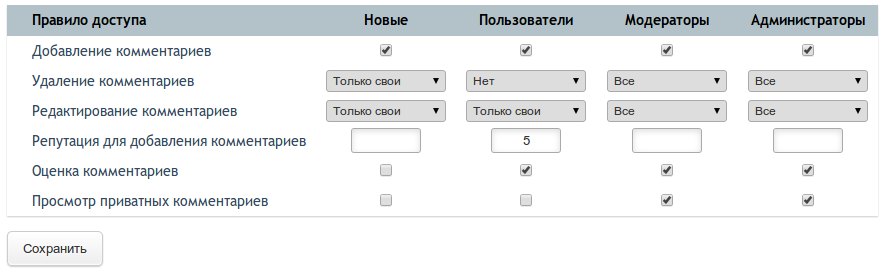
For example, this is how a list of rules and their customization form looks like in the “Comments” component’s control panel:
All rules can be devided into three types:
| flag | A rule that has two states – enabled and disabled. Displayed as a checkbox in the interface |
| list | A rule that has several preset values to select from. Displayed as a dropdown list in the interface. |
| number | A rule as a number. Displayed as a text field in the interface. |
For example, you write the “Guestbook” component and want to configure the permission settings for three action types: entry adding, entry editing and limitation by reputation, which is required to add an entry. You can then provide three access rules:
| Rule | Title | Relevant type | Possible values |
|---|---|---|---|
| Entry adding | add_message | flag | yes or no |
| Entry editing | edit_message | list | own (one’s own only), all (all entries) |
| Min. reputation for adding | karma_limit | number | Number of user reputation points required to add an entry |
There are no special requirements for rule titles, however, they should consist of only Latin letters, numbers and underscore signs. The titles of possible values for such rules as list are formed on the same principle and you can give them any title you like.
Rule subjects
One component can work with several data entities. For example, if we write the labour exchange component, it can have two entities – CVs and vacancies. Herewith, suppose, we want to have an option to allow or disallow adding of both CVs and vacancies.
In this case, you do not need to create two separate rules (“CV adding”, “vacancy adding”). It is enough to create one rule (“adding”) and specify which subject (CV or vacancy) is in question at the moment.
In other words, one rule for one user may have several different values, depending on the current subject. The current subject is selected when customizing the rule and when checking its values (when there is a need to limit access).
Find the details below.
Creating Access Rules
Before you create the configuration form of access rules, create the rules by adding them to the database and to the component’s language file.
Database
The rules are stored in the common perms_rules table in the database. Each rule will have its own entry with the following fields:
| Field | Description | Example |
|---|---|---|
| controller | Component title that uses this rule | comments |
| name | Rule title | add |
| type | Rule type | flag |
| options | A list of possible values separated by commas. Only for the list type rules | own,all,any |
For each user group, each rule’s values are stored in the perms_users table. There is no need to add anything to this table manually (unless you are sure of what you are doing). Instead, the described below special configuration action will add these entries.
Language file
You should add labels to each rule in the component’s Language File. You need to add a label to each option (except own and all) for the list type rules.
The constant name of the rule label is formed according to the scheme: LANG_RULE_{COMPONENT}_{RULE}. For example, for the add rule of the comments component:
define('LANG_RULE_COMMENTS_ADD', 'Adding comments');
If you need to provide an explanation to the rule, you can define the constant according to the LANG_RULE_{COMPONENT}_{RULE} scheme, for example, (exaggerating, because explanation is needless here) for the add rule of the comments component:
define('LANG_RULE_COMMENTS_ADD_HINT', 'If enabled, users will be able to add comments');
The explanation will be displayed under the rule label in a list.
As for the options, the names of constants are formed according to the scheme: LANG_PERM_OPTION_{OPTION}. For example, if you have the list type rule and there is the any option among its possible values, the constant will look like:
define('LANG_PERM_OPTION_ANY', 'Any');
There are 2 preset constants for the own and all options in the system:
define('LANG_PERM_OPTION_OWN', 'One’s own only');
define('LANG_PERM_OPTION_ALL', 'All');
In other words, there is no need to add language constants for these two options.
Access Rule Configuration
Once the rules are in the database, you can proceed to create an action to configure them in the component’s control panel.
This action is predefined in the cmsBackend class by analogy with the action for Option Configuration. You just need to enable it and create a template.
The action outputs access rules for this component (see the screenshot at the beginning of the article) and processes the saving of their values in the database.
Enabling an action
Add the following string to the class description to make the control panel’s controller (backend.php) know that you want to use a standard action to configure access rules:
public $useDefaultPermissionsAction = true;
After this, the action will be available at this URL: /admin/controllers/edit/{component}/perms/{subject}.
You can use any combination of Latin letters and numbers as the subject title. If a component works with one content type only (for example, the comments component manages only comments), you can use the component name as a subject:
/admin/controllers/edit/comments/perms/comments
If you need several subjects (for example, CVs and vacancies in the “Labour exchange” component), devide the action into two separate actions:
/admin/controllers/edit/birzha_truda/perms/vakansii
/admin/controllers/edit/birzha_truda/perms/rezume
Both of these URLs will be physically processed by one action, however, there can be several menu links (see below).
Template of an action of options
For InstantCMS higher than 2.4.0
There is no direct need in creating the template for InstantCMS versions higher than 2.4.0. The /templates/default/controllers/admin/backend/controllers_perms.tpl.php file will be used by default.
Please note that if you need to show a link to documentation, create the LANG_HELP_URL_COM_CONTROLLER_NAME constant in the controller’s Language File and enter the information URL. In this case, the link to it will appear on the page with access rules.
For InstantCMS 2.4.0 and older
The template is a must up to version 2.4.0 inclusive.
Custom output template of access rules
Create the /templates/default/controllers/{component}/backend/perms.tpl.php file with the following content:
<?php

    $this->addBreadcrumb(LANG_PERMISSIONS);

    $submit_url = $this->href_to('perms_save', $subject ? $subject : false);

    echo $this->renderPermissionsGrid($rules, $groups, $values, $submit_url);
You can modify this template according to your needs.
Adding action to a menu
If your component’s control panel is going to have other sections in addition to the access rule settings, it makes sense to create a control panel menu.
For this, add the getBackendMenu() method in the control panel controller (backend.php).
public function getBackendMenu(){
    return array(

        // a link to the “Access” action
        // the third parameter in href_to is the subject’s title
        // if the component has only one subject, we pass
        // the component name ($this->name)
        array(
            'title' => LANG_PERMISSIONS,
            'url' => href_to($this->root_url, 'perms', $this->name)
        ),

        // ...add links to other control panel sections here...

    );
}
Redirection to an action
When switching to the component’s settings, control panel redirects a user to the indexaction of your control panel’s controller by default. For this reason, if your control panel does not need such an action, you can automatically redirect it to another action.
An example of redirection from the index action to the perms action (in the comments component):
class backendComments extends cmsBackend{

    public $useDefaultPermissionsAction = true;

    public function actionIndex(){
        //a redirection to the perms action for the comments subject
        $this->redirectToAction('perms', 'comments');
    }

}
Checking Access Rights
You can check the value of the current user’s acces rule in any part of the component (in controllers, actions, templates and model). The methods described below work identically in all parts.
The checking is carried out with the help of the cmsUser class static methods responsible for the current user information.
Checking flag and list
The flag and list type rules are checked with the help of the isAllowed($subject, $permission[, $value]) method, where:
| $subject | A subject title for the rule (or the component’s title, if it has one subject) |
| $permission | Access rule title |
| $value | A value for comparison. Default – true |
The method returns the comparison (true/false) result of the $value value with the value which is specified in the control panel for this rule and the current user group.
For example, the comments component checks if a user has a permission to add comments in the following way:
if ( cmsUser::isAllowed('comments', 'add') ) { ... }
And thus it checks if a user can delete comments (not only his or her):
if ( cmsUser::isAllowed('comments', 'delete', 'all') ) { ... }
In the second case, the delete rule has the list type and there is the all option among its possible values with which it is actually compared.
Checking number
There are two methods to check the number rules using the same incoming parameters as the above described:
| isPermittedLimitReached | Checks if the value specified in the rule has been achieved, in other words, if the $value value is larger or equal to the one specified in the rule settings |
| isPermittedLimitHigher | Checks if the value specified in the rule is larger, in other words, if the $value value is smaller than the one specified in the rule settings |
It is convenient to use the first method when it comes to limitations, which a user should exceed, for example, a limitation on minimum rating:
if ( cmsUser::isPermittedLimitReached('comments', 'min_rating', $user->rating) ) { ... }
The second method will come in handy for checking limitations that apparently did not occur, for example, a limitation on a maximum number of entries added per day:
if ( cmsUser::isPermittedLimitHigher('blog', 'max_posts', $user_posted_today) ) { ... }